


If you have one million things on your to-do list for the Holidays, then now might be a great time to do some corky crafts! Apparently that was my train of thought when I decided to take this on the week before final exams, while my husband was out of town, and with help from my three-year-old. If you choose to overload your plate as well, make sure you have a hefty glass of wine poured before I lead you through these very simple instructions for some fun cork ornaments! Cheers!
For each of these ornaments you will need four things that are not displayed in the supplies photo/list:
- a hot glue gun
- glue sticks
- wine
- patience (if you choose to do this while you have children running around), otherwise, they’re super simple!


Rudolph the Wine-Drunk Reindeer


Here are your supplies for your Rudolph ornament:
- 4 regular wine corks
- 1 champagne cork
- 1 brown pipecleaner folded into antlers
- 1 permanent marker
- Something for a red nose (I got these glittery red balls from Hobby Lobby, a little red pom-pom would work too!)
- A string for hanging the ornament (I used a rustic twine).
- A ribbon for a bow
- And of course…the glue gun and glue sticks as mentioned above
Alright – this is pretty easy! I’ll show you the photos and I think that will be just enough for you to make these ornaments in your home!
(1) Glue two pairs of corks together. I chose to keep the “wine stained” side on the same side, I’ll show you next how that’s visible as Rudolph’s feet.


(2) Glue the two pairs together to make a 2×2 matrix….err…I mean square?


(3) Make the antlers from the pipe cleaner. I figured a 6-point buck would be sufficient, but if you want to add more points, have at it! Glue the antlers and hanging string as pictured below.


(4) Give the hanging string a half-twist on top and secure with a small bead of hot glue.


(5) Apply hot glue as pictured below. Place the underside of the champagne cork onto the hot glue, attempting to align the antlers and bottom of the hanging string in the gap between the 4 regular wine corks.


(6) Glue on Rudolph’s little red nose and add a cute smile with the permanent marker. DONE!


Wine-Stained Grapes – this one’s the easiest!
To make your wine-stained grapes ornament, you’ll need the following supplies:
- 13 wine-stained corks. The deeper the color, the better!
- 2 artificial vine leaves
- String for hanging the ornament – I chose this gold twine.
- Yea yea…and a hot glue gun and glue sticks.


(1) Secure the hanging string to the cork with hot glue as pictured below.
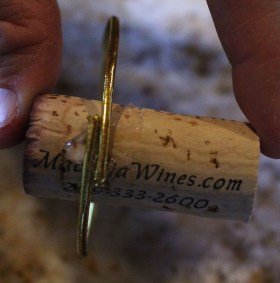

(2) Glue the artificial leaves to the side of the cork with the hanging string. Make sure the leaves are facing “outward” in the same direction as the wine-stained side of the cork.


(3) Glue the corks together in rows as pictured below. A nice shape consists of row 1 with 3 corks, row 2 with 4 corks, row 3 with 3 corks, row 4 with 2 corks and row 5 with 1 cork. If you have inconsistency in the shape of your corks or some are warped, you make have to skip this step and glue each cork individually in this shape as the rows may not line up. Just drink more wine and you’ll figure it out.


(4) Now glue those rows together and that baby is done! See – so easy and so pretty!


The Corky Christmas Tree
Okay, you’re probably a few glasses deep into your wine at this point…so let’s be extra careful with that glue gun and make sure you have all the supplies you need! If you run short on corks, just pop another bottle!
This is what you’ll need:
- 11 wine corks. Just make sure one has a wine-stain, the rest don’t matter.
- A bow for the top of the tree. If you found some mini gold stars, that would be cute – just something to give it the finishing touch!
- Green paint
- Paint brush
- Ornament hanging string. Crap…forgot that in the photo. I chose a rustic twine.
- Oh my gosh…do I have to tell you again? You’ll need a hot glue gun and glue sticks.


(1) Paint one end of 10 of the corks. I found that the green was more vibrant if I painted the un-stained side. Let them dry.


(2) Secure the hanging string to one painted cork as shown below.


(3) Give the hanging string a half-twist on the other side of the cork and secure with a small bead of hot glue.


(4) Glue your corks together in rows as shown below. Again, as mentioned in the grapes ornament, if you have inconsistency in the shape and length of the corks, you may have to glue these one-by-one or else they wont properly line up among the rows. If you have to do that, pour yourself another glass of wine and make sure your kids are still safely watching YouTube.


(5) Glue all the rows together.


(6) Glue on your tree topper, add a wine-stained cork for the stump and voila! You’re done! Look at you – you’re so crafty! Everyone’s going to be so impressed! Well, once you sober up…


